Secure Debug
Introduction
Secure Debug is a collection of hardware and software features to limit access to the debug port for devices in production. A simple hardware state machine controls the security level of the debug port (Serial Wire Debug or SWD) based on the value of a pair of OTP bits. The debug authentication library provides side channel authentication over a UART that can be used to unlock the debug port if it is configured in the secured state.
Note
Caution must be taken when configuring and testing secure debug. Once the OTP bits are configured to enable secure debug security, they cannot be reverted. Most tooling will no longer function with the chip, and further development on the chip will not be feasible.
Supported Hardware and Software
Secure Debug features are supported by the ATM33/e and ATM34/e SoC series.
Hardware Overview
At a hardware level, the debug security state at power-on is defined by two OTP bits (ATM_OTP_MASK_SEC_DBG_DEBUG_SECURED and ATM_OTP_MASK_SEC_DBG_DEBUG_DISABLED). Additionally, there is a register SECURE_DEBUG_STAT that can be checked to determine if SWD was soft-locked or permanently disabled.
Hardware applies the debug security state before the CPU boots. No intervention is required by the software to enforce the security state. When secure debug is either Secured or Disabled, access through SWD is disallowed even if a benign boot is enabled. When the port is secured (rather than disabled), the state can be cleared by software after a software challenge to prove the identity of the debug access requester. The authenticator is implemented in the MCUboot image that monitors a UART console port.
The software components require a UART bus to communicate the authentication challenge and response. Therefore, UART_RX and UART_TX will need to be available. The implementation can be demonstrated on UART0, which is readily available for applications.
Debug Security Levels
Debug Enabled
This is the default configuration. If neither OTP is set, the debug interface will be enabled and freely available at all times. The debug port cannot be disabled by software in this mode.
Debug Secured
If ATM_OTP_MASK_SEC_DBG_DEBUG_SECURED is set, the debug interface will be disabled by hardware at power-up. The SECURE_DEBUG_STAT register can enable the debug interface (sec_debug_unlock) or force the debug interface to stay disabled (sec_debug_sticky_disable) until the next power-on sequence. This functionality is available in the sec_debug driver.
Once this mode is enabled, use of the debug interface will be severely limited based on the method of authentication. This mode is only recommended for devices in production that are ready to be sealed/packaged for the final end user.
Warning
Secure DEBUG may become incompatible with certain production workflows. The restrictions imposed come at a cost and are intended to prevent tampering with devices in most settings. Please keep this in mind when this feature is used.
To enable secure debug, users can issue the following command (this is irreversible):
west atmotp burn --board <board> --device <serial> --otp SEC_DBG_CONFIG.DEBUG_SECURED --jlink
Debug Disabled
If ATM_OTP_MASK_SEC_DBG_DEBUG_DISABLED is set, the debug interface is permanently disabled and cannot be enabled.
To completely disable secure debug, users can issue the following command (this is irreversible):
west atmotp burn --board <board> --device <serial> --otp SEC_DBG_CONFIG.DEBUG_DISABLED --jlink
Software Overview
Debug Authentication is implemented at the software level. The SDK provides an authentication side channel operating over a UART that can perform authentication using Elliptic Curve Cryptography (ECC) and Elliptic Curve Digital Signature Algorithm (ECDSA).
Debug authentication only has an effect if the device is in Debug Secured mode. Authentication is still possible in the other modes for testing and simulation purposes, but the hardware state of debug security cannot be changed.
Configuration
Secure debug runs as part of MCUboot. All examples with MCUboot can be built with secure debug enabled by adding the following build-time options while building MCUboot:
To build with secure debug, add the following additional flags:
-DCONFIG_ATM_MCUBOOT_SECURE_DEBUG=y -DDTS_EXTRA_CPPFLAGS="-DUSE_ATM_SECURE_DEBUG"
Note
If building with DFU_IN_FLASH, then your flags will look like this:
-DCONFIG_ATM_MCUBOOT_SECURE_DEBUG=y -DDTS_EXTRA_CPPFLAGS="-DDFU_IN_FLASH;-DUSE_ATM_SECURE_DEBUG"
The DTS option -DUSE_ATM_SECURE_DEBUG will enable UART0 as a bi-directional console port for authentication use.
The MCUboot extension for secure debug will use a default private ECC-P256 key to generate the public ECC-P256 key stored in the image. This is a widely distributed key and should not be used in production.
CONFIG_ATM_SEC_DEBUG_AUTH_SIGNATURE_KEY_FILE=<pem file>is an optional variable to choose a specific .pem file. A .pem file is a public/private key certificate file generated by tools such as OpenSSL. The default uses the MCUboot development public key certificate, which is widely distributed. Note that the Secure Debug key and the Secure Boot key should not be the same.USE_STATIC_CHALLENGE=1is used to select a static (constant) challenge that is unique to the device rather than generate a random challenge on each debug unlock request. Zephyr only supports the STATIC challenge method.
At this time, the authenticator implements a 500ms default timeout through CONFIG_ATM_MCUBOOT_UART_DEBUG_AUTH_TIMEOUT_MS while monitoring the console port for characters. You can adjust as needed -DCONFIG_ATM_MCUBOOT_UART_DEBUG_AUTH_TIMEOUT_MS=<milliseconds> to extend the timeout.
Warning
Do not use the default PEM file in production. This is only for development purposes and is widely distributed in SDK releases.
Compiling in the Public Key
By default, the public key is compiled into the MCUBoot image. As part of the build process, a public_debug_keys.gen.c file is generated and included in the MCUBoot image. From there, MCUBoot can use the key for debug authentication.
Usage
Debug authentication happens during the boot sequence while MCUBoot is executing. If no authentication occurs during the boot sequence, MCUboot will sticky-lock the debug port until the device is reset.
Authentication is always possible, even if the OTP bits have not been set. This allows authentication to be tested while debugging is still available.
The SDK provides a simple Python script to authenticate with the device, and it is provided in openair/tools/scripts/sec_debug_unlock.py. This tool requires PySerial. It can be invoked in the following manner:
python sec_debug_unlock.py -v -k <SECURE DEBUG PEM FILE> -p <SERIAL PORT> [-b <BAUD RATE>]
-k <SECURE DEBUG PEM FILE> pem file containing the private key. Default private key is at openair/lib/atm_debug_auth/root-debug-ec-p256.pem
-p <SERIAL PORT> serial port to authenticate on
-b <BAUD RATE> optional baud rate, defaults to 115200
After authentication is successful, the device will disable the watchdog and enter a benign state, ready for the debugger to attach.
Authentication Protocol
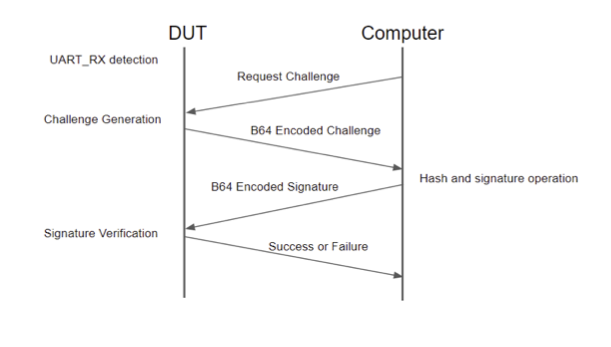
Figure 1 - Authentication Flow
The authentication protocol over UART is a simple challenge/response. The process starts when the UART_RX pin is held high during boot. When this is detected, there is a default timeout of 5 seconds. If no valid command is received before the timeout expires, the boot continues as normal, and the debug port will be sticky disabled.
The challenge is a static challenge that is constant and unique for the targeted device. Random challenges are not currently supported in Zephyr.
A static challenge remains fixed and consists of data that is unique to the device (chip data, board data, and secure journal contents). The static challenge only requires a single response code (signature of the challenge data) that can be reused for every authentication request. The static challenge does not require continuous access to the private key once the first challenge response is generated. An entity that has access to the private key (i.e., customer) can provide the signature for the static challenge, and it can be used in perpetuity with that unique device. The signature could be stored in a secure database or generated at the time it is required, in which the unlock code can be given to a 3rd party. The unlock code is only valid for the targeted device.
The firmware will respond with the “Static Challenge” message when responding to a debug request. The host must process and return a response to this challenge using the DBG STATIC_RESPONSE command (see below).
Authentication Commands
All commands begin with “DBG “ and end with a newline character “\n”. All responses from the device are plain text and end with a newline character “\n”.
Command |
Effect |
Text Response from Device |
|---|---|---|
DBG STATUS |
None |
If authentication has failed or has not been attempted: Debug locked |
DBG REQUEST |
Retrieves the static challenge |
Static Challenge: <BASE64 ENCODED CHALLENGE> |
DBG STATIC_RESPONSE <BASE64 ENCODED SIGNATURE> |
Decodes the signature and attempts to validate the signature. The host can inspect the challenge and issue the correct response (STATIC_RESPONSE). If the signature is valid, the debug is unlocked. |
If the signature is not valid: “Signature decode bad” If the signature is not valid: “Bad signature” If the signature valid: “Debug Unlocked” |
After a device has been unlocked, it will no longer respond to any commands.
Example exchange:
The external host is attached to the device over the UART connection and is expected to initiate the protocol (Sending: below) and receive/process responses from the device.
Sending:   'DBG REQUEST\n'
Received:  'Static Challenge: Hhvcb0GenPBp6a2qfM8jKdfhiD+DEGbomKqAKSf+8Sb1qJ3qFhevPZ47KXBnDe9J45877Tkbm6IN1NiRg9cWNQ==\n'
Sending:   'DBG STATIC_RESPONSE k+3BG4u3JmNOM25NKHW+pEG/dWGeVR368SuwJDfSJIiThh+5E1uroW6pbD9EZIHJaDcEN3xC1TwrdbPYl5InOg==\n'
Received:  'Debug unlocked\n'